Chocolate Eighth Notes: A Sweet Valentine’s Day Treat

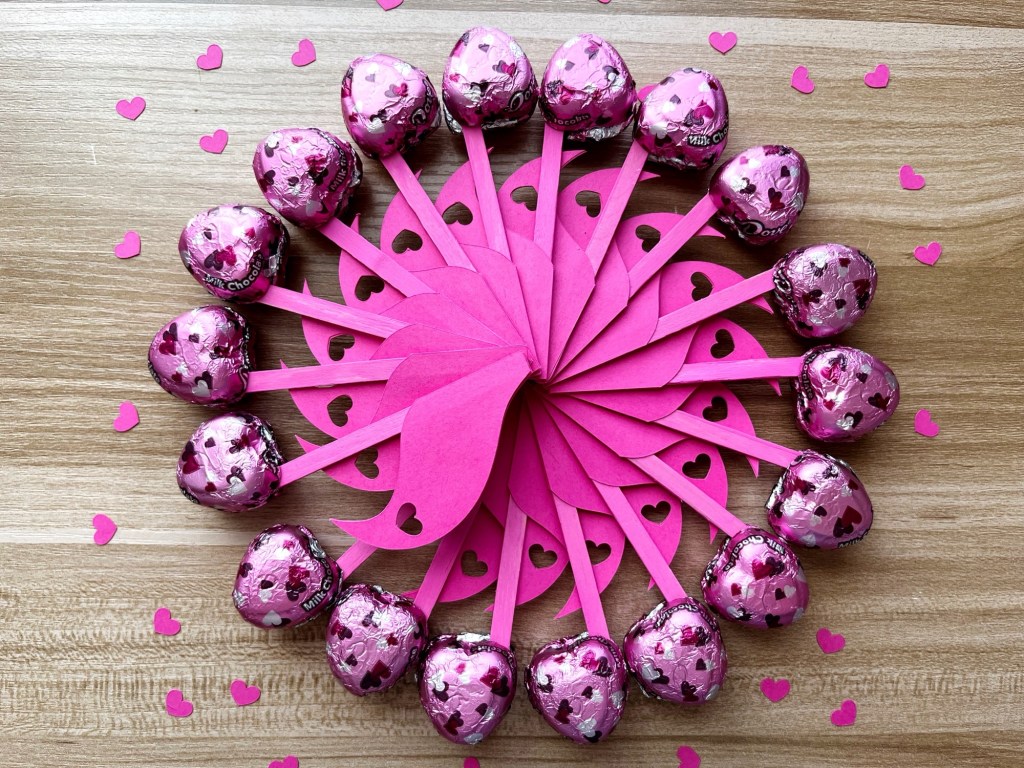
Every Valentine’s Day I like to make my students a little music-themed treat. This year I made these cute chocolate eighth note!

Chocolate eighth notes are arranged in a circle with the flags at the center. The chocolates are surrounded by tiny pink hearts.

Check out my Valentine’s Day round-up post with more Valentines treats, activities and games!

If you’d like to make these sweet treats, here’s what you’ll need:

Depending on the size of the heart-shaped chocolates you are using, you may need to trim your coffee stirrers. I cut mine in half by etching a notch in the coffee stirrer with the X-acto knife. Then I broke the stirrer in half.

An X-acto knife cuts a coffee stirrer

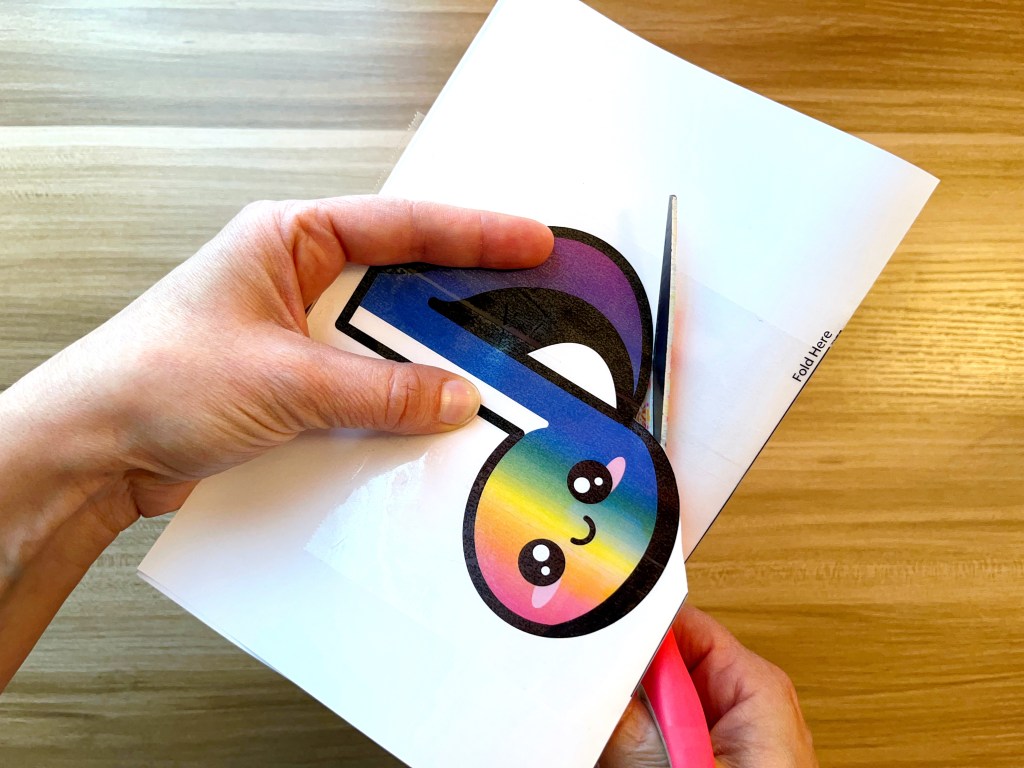
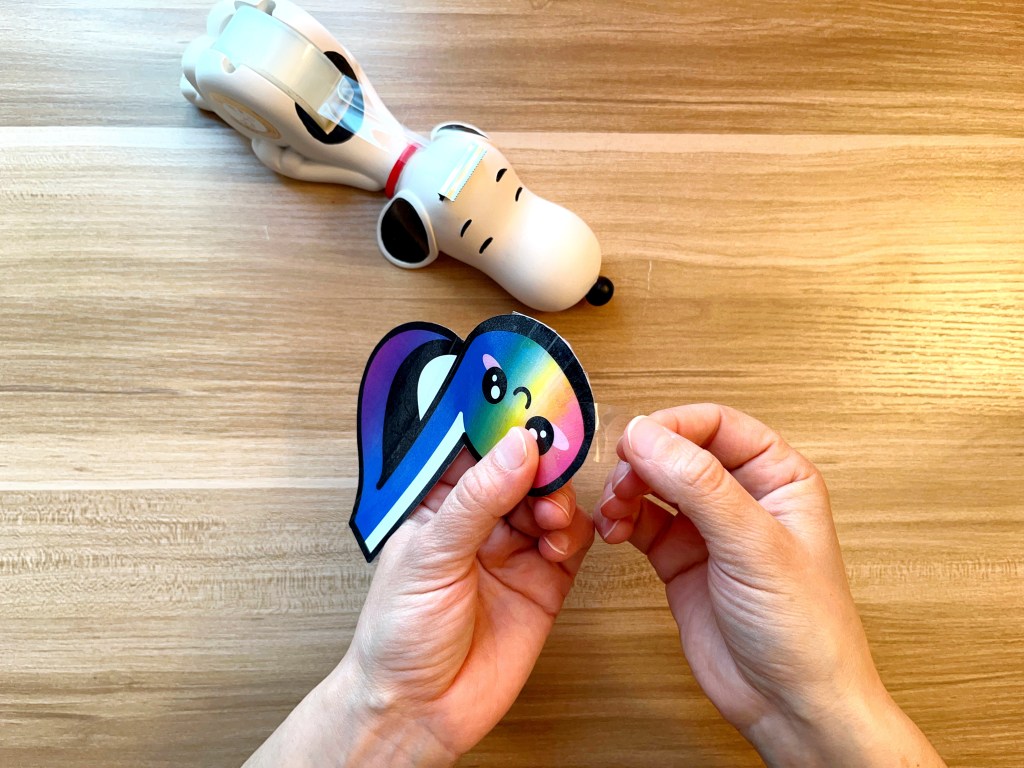
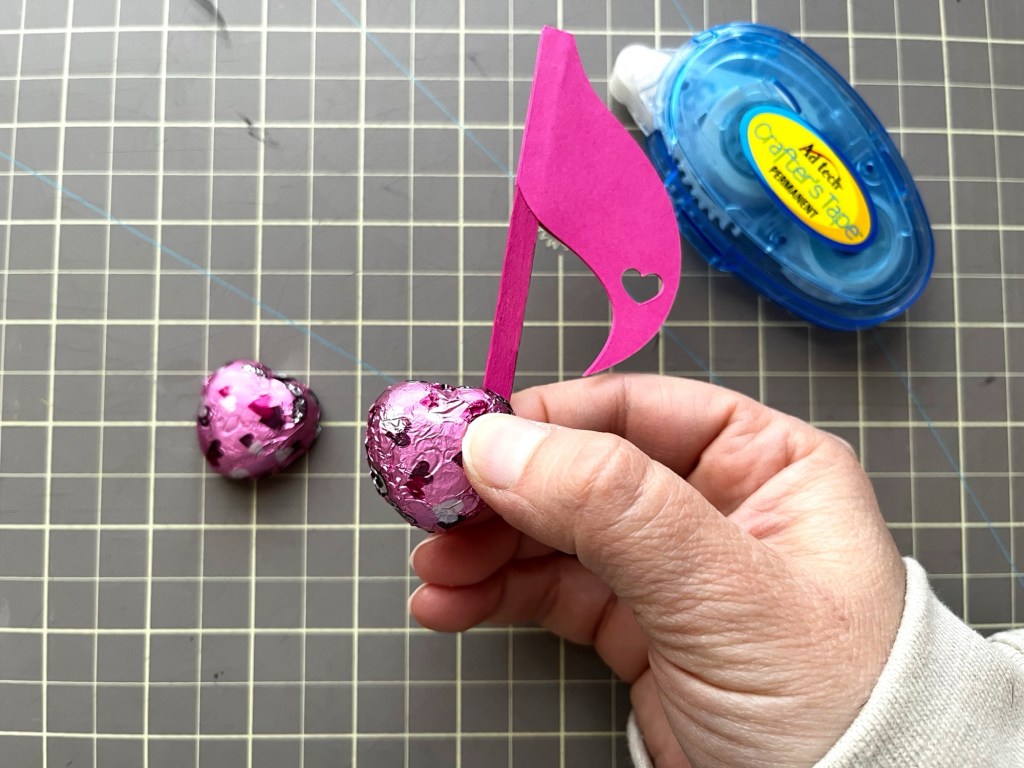
Paint the coffee stirrer pink and cut out the eighth note flags from the cardstock. Glue the flags to the coffee stirrers with stick glue.

A pink eighth note flag and stem are placed next to a bottle of pink paint and a tube of stick glue.

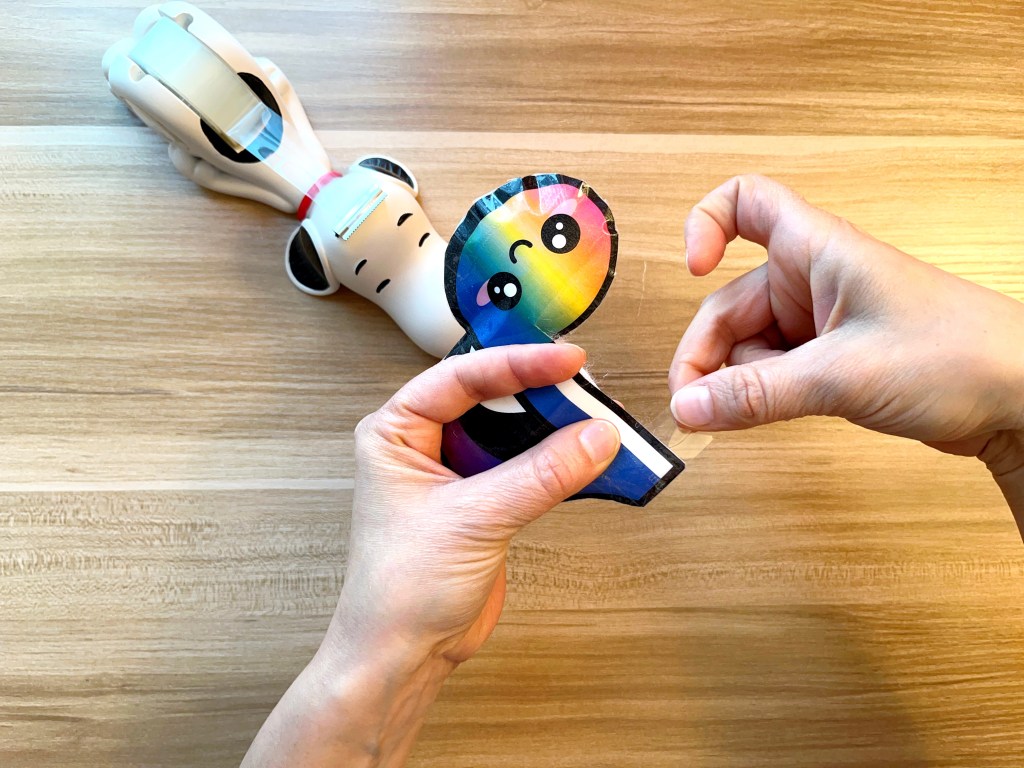
Apply the double-sided tape to the end of the coffee stirrer.

The crafter applies double sided tape to the end of the pink eighth note stem.

Press one of the chocolate hearts onto the double-sided tape.

A chocolate is pressed against the tape on the pink eighth note stem

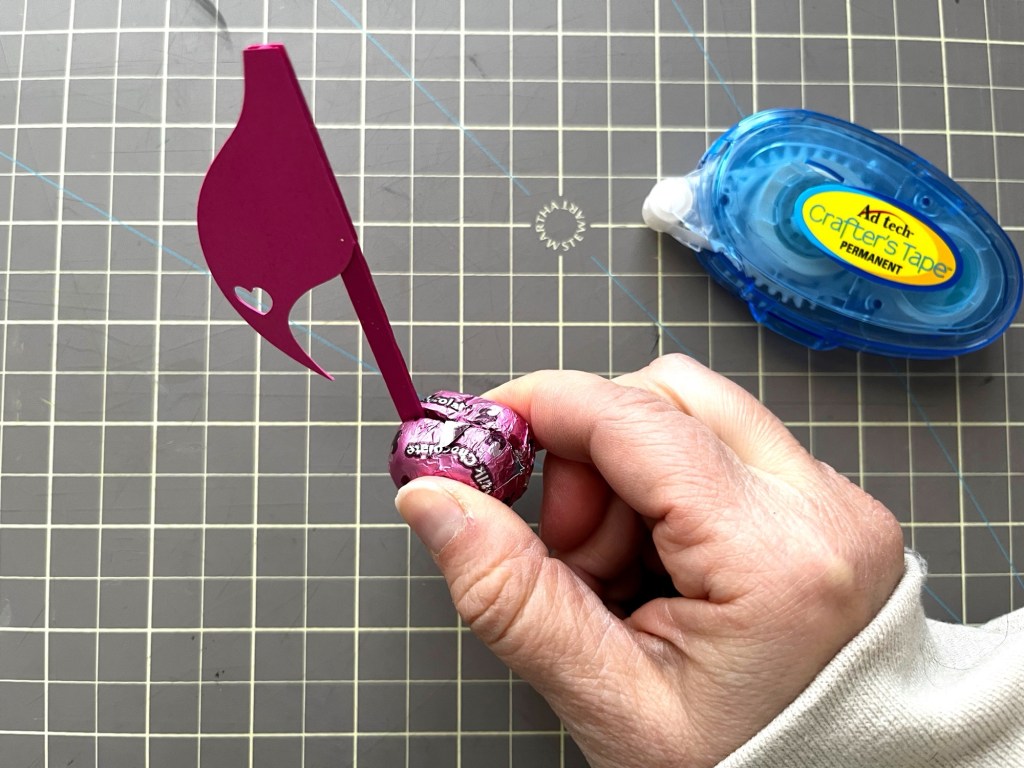
Apply double-sided tape the other side of the coffee stirrer and to the wrapping of the chocolate heart.

The crafter applies double sided tape to the back of the chocolate’s wrapper and the back of the pink eighth note stem

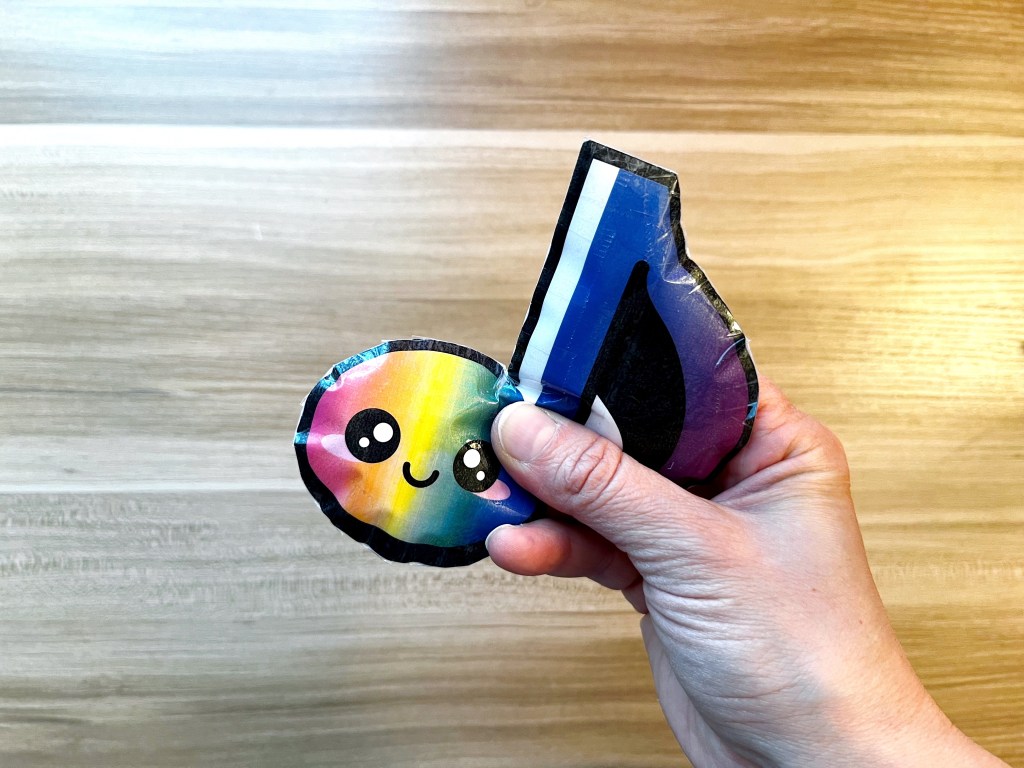
Press the second chocolate heart onto the first heart and stirrer.

The crafter presses the other chocolate onto the double sided tape

Optional: Write a message on the flag.

The crafter uses a black fountain pen to write a sweet message on the flag of the pink chocolate eighth note

And there you have it! 🙂 My students loved these sweet notes!

The pink chocolate eighth note sits on a piano keyboard

Explore more creative teaching ideas
  • Valentine’s Day Round-Up
    Make Valentine’s Day special for your students with free downloadable piano-themed Valentine’s cards and lots of music theory games that will have your students seeing hearts!
  • Sweet Words
    Love doesn’t come easy but Sweet Words certainly help! Your students will get all the feels with this elementary-level Valentine’s Day note-reading and keyboard awareness game.
  • I Can Heart-ly Wait for the Punchline
    A heart themed laugh-out-loud note reading game. I love this game because not only do students have to think about keyboard geography, they also have to be able to associate the notes with their exact location on the piano. 
  • Sky High Love
    The rhythms get longer as the heart towers get higher! Whose tower will remain standing in the end?! This adrenaline-inducing rhythm game is a great way to kick-off a lesson and get the energy up.

Let’s stay in touch, join the list!

As a “toucan” of our appreciation download a free set of note flashcards (link in our Welcome email)!

Processing…
Success! You're on the list.

We are a participant in the Amazon Services LLC Associates Program, an affiliate advertising program designed to provide a means for sites to earn advertising fees by advertising and linking to Amazon.com. As an Amazon Associate we earn from qualifying purchases.

Positive Notes: Recital Encouragement

Spring is officially here in the northern hemisphere and nature is coming back to life after a long winter’s rest. Flowers are blossoming, the birds are back and busy building nests, and the bugs are back, too (for better or worse!). But the butterflies fluttering about are not the only butterflies I’m noticing…

That’s because it’s recital season! Students are busy working on preparing their pieces for performance soon and some butterflies are starting to creep into their bellies when they start to think about the day of the recital.

We spend a lot of time in the weeks leading up to the recital talking about performance anxiety and stress testing our performance pieces. It helps my students to put things in perspective and deal with the anxiety that we all feel about performing in front of an audience.

I introduced something new at our recital this year: Positive Notes! Positive Notes are cute little eighth notes that each student received on the day of the recital. The Positive Notes had a short encouraging message to help focus my students’ minds before playing. They were a hit (the rainbows ones were the first to run out!!).

The message on the back of the Positive Note reads:

“Hi! I’m a Positive Note! I believe in you. When it’s your turn to face the music, remember you’ve worked very hard and are prepared. Go do your thing! You’ve got this!”

The Positive Notes are available as a free download in the Toucan Piano Store under Recital Resources. I hope that your students will enjoy them as much as mine did! Be sure to tag me on social media if you use them (I love seeing my creations out in the world!).

There are two versions of the Positive Notes: a printable and a paper squishy craft.

Positive Notes: Printable

This version of the Positive Notes is the easiest of the two versions and a quick way to get an encouraging message into the hands of your students.

A rainbow of smiling kawaii eighth notes with sit on a black background.

All you have to do is print them (double-sided printing) and cut them out. They looked so welcoming and joyful on our recital table!

A recital table is set up with programs, a poster of the classical composer Joseph Haydn, colorful positive eighth notes and compliment cards.

You can download the basic printable version of the Positive Notes here.

Positive Notes: Paper Squishy Craft

If you enjoy crafting (like I do!) nothing beats the paper squishy version of the Positive Notes!

Not only are they adorable and spreading positivity but they also double as a fidget and “finger warmer-upper” for your students as they sit waiting for their turn to play!

They do require more time to make but they are definitely worth it if you have kids who need that extra outlet for their nerves. And if you do a group lesson before your recital, this can be a fun craft for the kids to do themselves!

To make the Squishy Positive Notes, start by printing out the color of your choice on regular copier paper.

Printing out a rainbow colored paper eighth note squishy

Cover both sides of the print out with clear tape (I used packing tape because it’s wider and covers a larger area at once, but any clear tape will do).

Covering the print out of a rainbow colored paper eighth note squishy with transparent packing tape

Next, fold the paper along the “Fold here” line.

Folding the tape covered print out of a rainbow colored paper eighth note squishy

While holding the paper in a folded position, cut out the note (you will be cutting the front and the back out at the same time).

Cutting out a rainbow colored paper eighth note squishy
Two hands hold up the two halves of a rainbow colored paper eighth note squishy

Tape the edges of the two halves together, leaving an opening (I found it easier to leave an opening along the straight edge of the note).

Sealing a rainbow colored paper eighth note squishy with transparent tape

Stuff the note with fiber fill (stuffed animal filling). Don’t overstuff!

Stuffing a rainbow colored paper eighth note squishy with stuffed animal poly fill

Seal the open edge with some tape.

Sealing the open edge of a paper eighth note squishy with transparent tape

Your squishy is ready for the recital!!

Rainbow colored eighth note paper squishy being squeezed by a hand

You can download the paper squishy Positive Notes craft here.

Explore more creative teaching ideas
  • Compose a Ringtone
    Ringtones are helpful but what if we could make them special too?! This is a fun and quick project that even the most reluctant students can get behind.
  • Top Practice Tools Every Piano Student should Have: Curiosity
    Curiosity is the catalyst that gets students to start learning the piano in the first place and can be exactly what’s needed to keep them going for the long haul. Why is it so important and how do we keep it going? What if I don’t play an instrument, but want to encourage my child in their practicing? Check out all the answers plus download a free printable for parents!
  • How to Make your Own Music Theory Dice
    Music theory dice are a great tool to have in your piano teacher arsenal but most of the time what you need isn’t available to buy anywhere. DIY Music Theory Dice are so easy to make and they are completely customizable for any concept you would like to work on with your students.

Let’s stay in touch, join the list!

As a “toucan” of our appreciation download a free set of note flashcards (link in our Welcome email)!

Processing…
Success! You're on the list.

We are a participant in the Amazon Services LLC Associates Program, an affiliate advertising program designed to provide a means for sites to earn advertising fees by advertising and linking to Amazon.com. As an Amazon Associate we earn from qualifying purchases.

Classical Music Easter Eggs

I LOVE a good classical music pun and I feel it’s my responsibility as a piano teacher to share all of the awesome classical music puns with my students! Fortunately they humor me and get a kick out of it too (I mean who doesn’t love a good dad joke?!).

Each year I’ve been challenging myself to come up with different Easter egg crafts to hand out to my students before our Spring break. Last year I made music note eggs which were a big hit! This year our recital theme is Joseph Haydn so I decided to make a classical music pun egg for my students to 1) help them remember how to properly pronounce Haydn’s name and 2) get a chuckle out of them.

Four composer easter eggs with Haydn, Liszt and Handel sit in a pile of pink fake grass.

They are easy and cheap to make which is always a winning combo in my book! I even took it a step farther and made a couple of other designs just for fun. The possibilities are truly endless with this craft!

For this craft you will need:

Take a piece of copier paper and place it on top of a sheet of tissue paper. Using a pencil, gently trace the outline of the copier paper onto the tissue paper. Cut the tissue paper along the lines you traced. The tissue paper should now be the same size as the copier paper.

A person traces a the outline of a sheet of copier paper onto a sheet of white tissue paper using a green mechanical pencil.
A person cuts a sheet of white tissue paper using a pair of pink scissors.

Place the tissue paper on top of the copier paper and tape the top edge of the papers together (this will give the tissue paper stability when it runs through the printer). I used painter’s tape but any tape will do. Trim any excess tape off the edges of the papers.

A person tapes together a sheet of copier paper and a sheet of white tissue paper using blue painter's tape.
A person folds over a strip of blue painters tape to secure two sheets of paper together.

Feed the taped edge of the papers into your printer and print out your design onto the tissue paper.

Paper is feed into a laser printer.
A sheet with mutliple images of the classsical music composer Joseph Haydn exits a printer.

Cut out the designs carefully.

Multiple images of classical music composer Joseph Haydn lay on a wood desk.

Apply a coat of Mod Podge to the area of the plastic egg where you will be placing the design. Place the design onto the egg.

A person applies a layer of Mod Podge to a light blue plastic easter egg.
A person glues an image of Joseph Haydn to a blue plastic easter egg.

Gently tap the design into place and apply a layer of Mod Podge on top of it to seal it. Set the egg aside to dry.

A person taps the image of Joseph Haydn onto a blue plastic easter egg.
A person seals the image of Joseph Haydn onto a blue plastic easter egg using Mod Podge and a paintbrush.

Once the egg is dry, take a Sharpie and write your message on the egg. In my case I wrote: “What’s Haydn in the egg?”

A person writes a on a blue plasitc easter egg using a black Sharpie permanent marker.

Gently pop the egg and carefully cut the design where the seam of the egg has been glued shut using the X-acto knife (utility knife). Then fill the egg with goodies!!

A person cuts the image of Joseph Haydn along the seam of a blue plastic easter egg using an xacto utility knife.
A person fills a blue plastic easter egg with candy.

I loved my Haydn egg so much I decided to experiment with a few other designs for fun! One with sheet music and two with composer puns: “Grocery Liszt: Candy, Candy, Candy!” and “Handel with care!

Classical music pun on plastic easter eggs sit in a pile of pink grass.

Explore more creative teaching ideas
  • Top Practice Tools Every Piano Student should Have: Curiosity
    Curiosity is the catalyst that gets students to start learning the piano in the first place and can be exactly what’s needed to keep them going for the long haul. Why is it so important and how do we keep it going? What if I don’t play an instrument, but want to encourage my child in their practicing? Check out all the answers plus download a free printable for parents!
  • Compose a Ringtone
    Ringtones are helpful but what if we could make them special too?! This is a fun and quick project that even the most reluctant students can get behind. Plus it makes a sweet Mother’s or Father’s Day gift!

Let’s stay in touch, join the list!

As a “toucan” of our appreciation download a free set of note flashcards (link in our Welcome email)!

Processing…
Success! You're on the list.

We are a participant in the Amazon Services LLC Associates Program, an affiliate advertising program designed to provide a means for sites to earn advertising fees by advertising and linking to Amazon.com. As an Amazon Associate we earn from qualifying purchases.

Music-Themed Candle Craft

Every year I make my students a music-themed gift around the holidays (usually an ornament! You can check out last year’s gift here). I have a lot of students so I always opt for a handmade gift because 1) I love crafting and showing my love for others through crafting and 2) it’s extremely cost effective.

I gift them to my students at our last lesson of the year and it always warms my heart when parents share pictures of my ornaments on their trees year after year. This year I decided to transform battery-operated candles into little piano themed lights for their pianos at home. I made a total of 36 candles and the final cost was roughly $1.50/candle (not including the time to make them, which was several hours spread out over 3 days. Time is always something to keep in mind when crafting in quantity!).

If you’d like to watch me craft a candle, check out my YouTube short:

For this craft you will need:

Picture of tools and supplies needed to complete the craft. Tools required are hot glue gun and glue, Mod Podge waterbased sealer and glue, paintbrush, scissors, bowl, and nail file. Supplies needed are battery-operated candles, music note napkins, glitter, twine and your choice of embellishments (such as ribbon, keyboard charm, jingle bells, and sequin holly leaves).

Start by opening up the napkin and loosely measuring how many candles you can cover with a single napkin. My candles were 2 inches high and 1.5 inches in diameter, which allowed me to cut the napkin into eight equal rectangles. Cut the napkin according to the measurements of your candles.

Music note napkin unfolded with a pair of scissors hovering over it, indicating that the napkin should be cut into rectangles to fit the battery-operated candles.
Music napkin cut into eight equal rectangles.

The napkins I used have 3 plies (layers of napkin) which would make them a little thick and prone to wrinkling. I removed one of the plies (you could remove two plies and keep only the layer that has the sheet music printed on it. I tried this and found the napkin to be extremely delicate when gluing to the candle. One ply is possible to work with, just be extra gentle).

Napkin has three plies. Photo shows the back ply being removed to make the napkin thinner.

Now that the napkin is all prepped, cover the battery-operated candle with a layer of Mod Podge (or white glue).

Battery operated candle is being covered with a layer of Mod Podge (sealant glue) using a paintbrush.

Carefully attach the napkin to the candle, patting it gently to adhere it to the candle. If the napkin has any indentations in it, you can carefully smoothen them out by running your finger across them.

Music themed napkin rectangles is placed on the battery operated candle covered in glue.

Once the candle is dry, use a nail file to scrape the excess napkin off. Remember to always move the nail file towards the center of the candle (not away from it!) to keep the napkin from tearing. The napkin will fall off and leave a nice clean finish to the bottom and top of the candle.

A nail file is being scraped against the edge of the battery operated candle to remove the excess napkin from the candle.
Photo show the napkin easily falling off by using the nail file. This method leaves a clean edge along the candle.

Add a layer of Mod Podge over the napkin to protect it. Once it is dry, it will give the candle a slightly waxy look, like a real candle.

A layer of Mod Podge (sealant glue) is place on the candle with the napkin to protect the napkin.

Apply a thick layer of Mod Podge along the outer and inners rims of the candle to make it look like melted wax.

A paintbrush is used to apply a thick layer of Mod Podge (sealant glue) along the outer rim of the candle to imitate melted wax.
A paintbrush is used to apply a thick layer of Mod Podge (sealant glue) along the inner rim of the candle to imitate melted wax.

Pour the glitter into a small bowl and dip the candle with the thick layer of Mod Podge into the bowl to cover the Mod Podge. The “melted wax” will now have a sparkly shine to it.

The candle is dipped into a bowl filled with white glitter. The glitter sticks to the Mod Podge (sealant glue) along the inner and outer rims, making the melted wax sparkle.

Time for the embellishments! Apply a little hot glue to one end the ribbon and attach it to the candle. Measure how long the ribbon should be to wrap completely around the candle and trim it to size. Glue down the rest of the ribbon.

Apply hot glue to the ribbon embellishment.
Wrap the ribbon embellishment around the battery operated candle. Cut the ribbon to size and glue in place.

Cut enough of the twine string to wrap it three times around the candle (leave a little extra on both ends to tie it into a bow!).

Wrap twine around the red ribbon embellishment 3 times.

Thread the keyboard charm onto the twine string and tie a bow.

Thread the keyboard charm through the twine and tie the twin in a bow.

Depending on the size of the charm (mine was rather large), add a little bit of hot glue to help hold it in place.

Apply hot glue to the back of the keyboard charm to help hold it in place.

Hot glue the holly leaves to the candle. I placed mine right above the twine bow.

Holly leaf sequins are hot glued to the candle as additional embellishments.

Final touch! Hot glue the jingle bell to the candle.

A golden jingle bell is hot glued to the candle and holly leaves as a final embellishment.

And there it is! Have fun experimenting with different embellishments (I used a red and white twine on some candles and replaced the holly leaves for gold glittery leaves on others)… if you teach siblings, it’s always nice to have something a little different so they each have their own special gift. You can even use a larger candle to make a beautiful holiday decoration for your piano (because we teachers deserve pretty things too!).

Finished music note candle craft sitting on a piano keyboard. The candle has red ribbon and twine tied around it as well as a keyboard charm, holly leaves and a jingle bell as embellishments.

They look so pretty together all lit up and ready to head off to my students’ homes!

Several music note candles sitting on a piano keyboard. The candles are lit up. The candles have red ribbon and twine tied around them and have a keyboard charm, holly leaves and a jingle bell as embellishments.

Let’s stay in touch, join the list!

As a “toucan” of our appreciation download a free set of note flashcards (link in our Welcome email)!

Processing…
Success! You're on the list.

We are a participant in the Amazon Services LLC Associates Program, an affiliate advertising program designed to provide a means for sites to earn advertising fees by advertising and linking to Amazon.com. As an Amazon Associate we earn from qualifying purchases.

Music Ornament Craft

Every year I make an ornament for my students as a gift during the Holiday season. I try to make it music-related or a tie-in with a practice challenge we are working on in December. I gift it to them during our last lesson before our winter break. I love to hear how they use the ornaments on their trees every year and how they enjoy watching their collection grow! It always warms my heart!

This year I was inspired by an ornament I found on Pinterest (unfortunately it doesn’t appear to be available for purchase anymore on Etsy). I wanted to put my own twist on it and add a little more color and musical elements. I made a total of 40 ornaments and the final cost was roughly $1/ornament, including the use of coupons and store promotions (plus the time to make them. It did take me several hours, so that’s definitely a consideration to factor in!).

For this craft you will need:
– Vintage sheet music (I found some free vintage sheet music online and printed it out)
1 inch unfinished wood craft cubes
Mod Podge or white glue
– Stamp pad(s) of your choice (I used rich cocoa and gold)
Thin ribbon
Treble clef charms
Mini jingle bells (10 mm in diameter)
Mini red pom-poms (5 mm in diameter)
– Seasonal greenery (I chose glittery green leaves)
Hot glue gun and glue

Cut the vintage sheet music into 0.95″ (2.40 cm) squares. You will need 6 squares per wood cube.

Use the Mod Podge (or white glue) to adhere the sheet music squares onto the sides of the wood cube.

Once the glue has dried, use the stamp pad(s) to age the paper. I started with the rich cocoa stamp pad, lightly working from the edges inwards. I did all six sides, then went over the cube a second time, this time with the gold stamp pad to give it more depth (and this is the point that my fingers became a rich cocoa in the pictures! lol).

I decided to seal the ink with a layer of Mod Podge for added protection. This step is optional, but it does give the cube a nice shine, so I was happy to put in the extra time.

String the treble clef charm through the ribbon and wrap the ribbon around the cube like you would wrap a ribbon around a present. Make sure that the charm stays on the side that you want to be the bottom. I added a dot of hot glue to secure the charm to the bottom of the cube. Tie a knot at the top of the cube, making sure that the ribbon is taut against all the sides of the cube.

Then tie a knot with the ends of the ribbon to create a large loop with which to hang the ornament to the tree.

Add embellishments, such as greenery, pom-poms, and a mini jingle bell, to the top of the cube using hot glue. Try to distribute the embellishments in a way to hide the knot on the top of the cube.

The music ornament is all done! I made mine in three different colors: green, red, and blue. I was so happy with the way they turned out. I can’t wait to give them to my students!

Let’s stay in touch, join the list!

As a “toucan” of our appreciation download a free set of note flashcards (link in our Welcome email)!

Processing…
Success! You're on the list.

We are a participant in the Amazon Services LLC Associates Program, an affiliate advertising program designed to provide a means for sites to earn advertising fees by advertising and linking to Amazon.com. As an Amazon Associate we earn from qualifying purchases.